There’s a magic that happens in the kitchen, one that often takes me back to sweet memories. Stained Glass Cookies were first introduced to me at a very tender age when I was just a sprightly girl curious about the world around me. I can almost feel the warmth of my grandmother’s kitchen enveloping me, her laughter twirling through the air as we baked side by side. As she carefully melted the colorful hard candies, we watched them bubble and swirled beneath the glow of the oven light, transforming mere sugar into a spectacle of vibrant hues. Those Stained Glass Cookies became our special treat for every holiday gathering, a testament to our shared love for whimsical baking.
I would hold each cookie up to the light, mesmerized by how the sun would shine through their delicate, jewel-toned centers, reminding me of stained glass windows in our beloved old church. I felt a sense of pride each time I pulled a tray from the oven, knowing that I’d played a part in creating something so lovely. Even now, as I approach these cookies with dough and excitement in hand, I feel her spirit guiding me, reminding me that cooking is about creating joy, not just food.
The joy that comes from sharing these Stained Glass Cookies with family and friends is unparalleled. They’ve become a part of our holiday celebrations and birthday parties, a sweet excuse for not only indulging in something delicious but also reminiscing about moments spent in the kitchen.
When you take your first bite, the crisp buttery exterior gives way to that sweet explosion of flavor from the luscious candy center. Each cookie tells a story, and I genuinely believe they have a way of turning ordinary days into something extraordinary.
Flavor and Popularity
The Unique Flavor Profile of Stained Glass Cookies
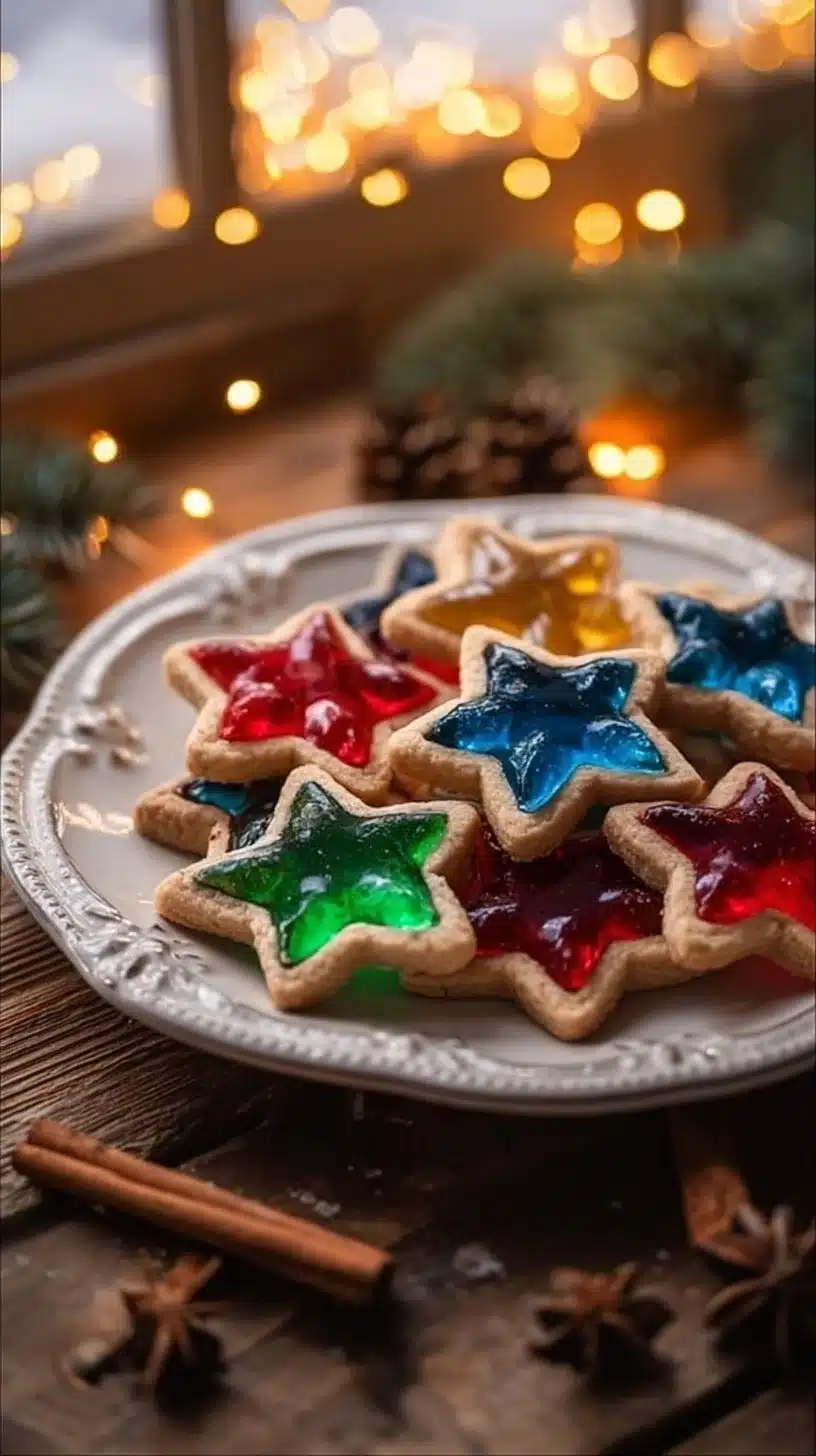
Stained Glass Cookies are not just visually appealing; they bring together a symphony of flavors that dance on your palate. The buttery cookie base provides a rich, tender texture that melts in your mouth while beautifully complementing the bold sweetness from the melted candy. Think of it as a delightful contrast, where the delicate, crumbly cookie meets the vibrant burst of fruity flavors.
You can create variations by using different flavors like cherry, lemon, or even green apple candies, each bringing its own nuance to the table. The heavenly aroma of vanilla combined with the fresh burst of candy is sure to make your mouth water. These cookies stand out during holiday gatherings, filling the room with warmth and laughter. Their delightful crunch paired with that unexpected chewy candy center keeps family and friends reaching for just one more—who knew comfort could taste this good?
Why This Recipe Is a Family Favorite and Crowd-Pleaser
Why do Stained Glass Cookies remain a cherished recipe in our family? Well, it’s all about the delightful charm they carry. Their vibrant colors make them an eye-catching centerpiece on any table, while the flavors appeal to taste buds of all ages. Kids love the fun of seeing their creations sparkle and shine, while adults appreciate the nostalgic comfort they offer.
Through each holiday season or birthday celebration, I’ve watched as laughter fills the room while family members dive into a platter of these cookies. They spark stories and memories, a shared experience that turns into a beautiful tradition. Stained Glass Cookies truly encapsulate the essence of togetherness and joy in baking, offering not just a treat but an opportunity to create lasting bonds.
Ingredients and Preparation
Essential Ingredients and Possible Substitutions
To create these delightful cookies, you’ll need to gather a few essential ingredients. Here’s what you’ll require:
- Butter: A base for that rich, buttery flavor. Don’t skimp; using unsalted butter ensures you can control the saltiness later.
- Sugar: Regular granulated sugar to add sweetness and a beautiful texture to your cookies.
- Brown Sugar: For added depth and moisture, using light brown sugar will give a hint of caramel.
- Eggs: One large egg acts as a binder while contributing to the fluffiness of the dough.
- Vanilla Extract: Pure vanilla extract elevates the flavor, making your cookies taste homemade.
- Flour: All-purpose flour provides structure; stick with this for the best results.
- Baking Powder: Just a teaspoon helps create that light, airy texture.
- Colorful Hard Candy: This will be your stained glass; feel free to mix different flavors to create a vibrant assortment.
In case you find yourself out of any ingredient, here are some substitutions:
- For butter, you can use margarine or a dairy-free alternative.
- Swap granulated sugar with brown sugar if you’re looking for a deeper flavor.
- You could also use a flax egg (1 tablespoon ground flaxseed + 2.5 tablespoons water) for a vegan twist.
Step-by-Step Recipe Instructions with Tips
Preheat the Oven: Set your oven to 350°F (175°C). Line two baking sheets with parchment paper—this prevents sticking and makes cleanup a breeze.
Make the Dough: In a large bowl, cream together the butter and sugars until light and fluffy. Add the egg and vanilla extract, mixing until combined. Gradually introduce the flour and baking powder, ensuring everything is well incorporated.
Chill the Dough: Wrap the dough in plastic wrap and let it chill in the refrigerator for at least an hour. This helps develop the flavors and makes it easier to handle.
Prepare the Candy: While the dough chills, crush your colorful hard candies into small pieces. You want the pieces to fit snugly in your cookie shapes, so aim for a size similar to chocolate chips.
Roll and Cut the Dough: Roll out the chilled dough on a floured surface to about ¼-inch thick. Use cookie cutters to create various shapes, making sure to cut out a smaller shape in the center of each cookie.
Fill With Candy: Place the cookie shapes on your prepared baking sheets. Fill the holes with the crushed candy, making sure not to overfill, as it can bubble over.
Bake: Bake the cookies for about 10 to 12 minutes. Keep an eye out—when the edges start to turn golden brown, they’re ready.
Cool and Enjoy: Allow the cookies to cool on the baking sheet for a few minutes before transferring them to a wire rack. Once cooled, a beautiful stained glass effect peeks through the center.
Cooking Techniques and Tips
How to Cook Stained Glass Cookies Perfectly
For cookies that sing with flavor and that lovely glass-like finish, pay attention to a few essential cooking tips:
- Chill Your Dough: This isn’t just a suggestion! Chilling keeps your cookies from spreading too much in the oven while baking.
- Don’t Overbake: Keep a watchful eye. The cookies should have a soft center when you take them out. They will continue to bake slightly while cooling.
- Use Fresh Ingredients: Fresh eggs and vanilla can make a noticeable difference in flavor.
Common Mistakes to Avoid
- Overmixing the Dough: Mixing too vigorously can lead to tough cookies. Gently combine to keep that tender bite.
- Skipping the Chill: Not chilling your dough may result in flat cookies. Patience here pays off!
- Filling Too Much: Overloading the cookie with candy can cause it to spill over. You want a perfect balance for the best outcome.
Health Benefits and Serving Suggestions
Nutritional Value of Stained Glass Cookies
While Stained Glass Cookies are undeniably a treat, enjoying them in moderation can make them part of a balanced diet. With whole ingredients like butter and eggs, they provide some energy and delicious flavors. However, they should definitely be an occasional delight, best enjoyed with loved ones!
Best Ways to Serve and Pair This Dish
Once your Stained Glass Cookies are cooled and ready to dazzle, consider serving them alongside a warm cup of tea or coffee for a comforting afternoon snack. They also make fantastic additions to dessert platters or cookie exchanges—their colorful presentation steals the show! You could even pair them with ice cream as a fun dessert experience, especially on a warm summer evening.
FAQ Section
What type of mushrooms are best for Stained Glass Cookies?
Stained Glass Cookies don’t include mushrooms; this is a whimsical cookie charm! However, if you meant to inquire about pairing these cookies with savory dishes, consider sautéed garlic mushrooms for a contrasting flavor journey.
Can I use dried garlic instead of fresh?
Yes! If you don’t have fresh garlic on hand, you can use dried garlic. Just be sure to adjust the amount, as dried garlic is more concentrated.
How do I store leftover Stained Glass Cookies?
To keep your cookies fresh, store them in an airtight container at room temperature. They’ll usually last for about a week, but let’s be honest—these cookies often disappear much sooner!
Can I freeze Stained Glass Cookies?
Absolutely! You can freeze them before or after baking. For best results, wrap them tightly in plastic film and store them in a freezer-safe container. When you’re ready to enjoy, simply thaw them at room temperature.
As I finish sharing my love for Stained Glass Cookies, I hope you’ll find the same warmth and joy that they bring me. If you’re like me, you often find that the kitchen serves as the heart of the home—where moments of laughter and love unfold amidst the aroma of baked treats. These cookies aren’t just delicious; they are a bridge to memories, a chance to create new traditions. Trust me, you’ll want to make this recipe again and again. Happy baking!
Print
Stained Glass Cookies
- Prep Time: 15 minutes
- Cook Time: 12 minutes
- Total Time: 75 minutes
- Yield: 24 cookies 1x
- Category: Dessert
- Method: Baking
- Cuisine: American
- Diet: Vegetarian
Description
Delightful cookies featuring colorful candy centers that resemble stained glass, perfect for holiday gatherings and special occasions.
Ingredients
- 1 cup unsalted butter
- 1 cup granulated sugar
- 1/2 cup light brown sugar
- 1 large egg
- 1 teaspoon vanilla extract
- 3 cups all-purpose flour
- 1 teaspoon baking powder
- Colorful hard candy (various flavors)
Instructions
- Preheat oven to 350°F (175°C) and line two baking sheets with parchment paper.
- In a large bowl, cream together the butter and sugars until light and fluffy. Add the egg and vanilla extract, mixing until combined.
- Gradually introduce the flour and baking powder, ensuring everything is well incorporated.
- Wrap the dough in plastic wrap and chill in the refrigerator for at least an hour.
- While the dough chills, crush the colorful hard candies into small pieces.
- Roll out the chilled dough on a floured surface to about ¼-inch thick and cut into shapes, making sure to cut smaller shapes in the center.
- Place cookie shapes on the prepared baking sheets and fill the holes with crushed candy.
- Bake for about 10 to 12 minutes, watching for golden edges.
- Cool on the baking sheet for a few minutes before transferring to a wire rack.
Notes
Chill your dough for best results and do not overfill with candy to avoid spills during baking.
Nutrition
- Serving Size: 1 cookie
- Calories: 150
- Sugar: 10g
- Sodium: 50mg
- Fat: 7g
- Saturated Fat: 4g
- Unsaturated Fat: 2g
- Trans Fat: 0g
- Carbohydrates: 18g
- Fiber: 0g
- Protein: 1g
- Cholesterol: 30mg
Keywords: cookies, stained glass cookies, holiday baking, family recipes, desserts